Dashboards are a great way to visualize data at a glance as it is not possible for a manager to go and check everything in detail every time. In one of our recent post we have already covered how to create Dynamics CRM dashboard for a sales rep using Maplytics. Here in this blog will see how to create a query for individual Maplytics dashboards.
The following screenshot shows the dashboard which we had created in our earlier blog. This Dynamics CRM dashboard is created for a sales rep on the basis of his daily needs. It shows the data into four parameters – My Appointments, My today’s route, my open opportunities and sales by postal code.

Each of the parameter that shows the data plotted on the map is an individual Maplytics dashboard created based on that view. The user can create different Maplytics dashboards for various views of data as well. A Dynamics CRM dashboard combines many Maplytics dashboards together in single layout and this results into a Dynamics CRM dashboard providing data with different views to facilitate analysis just as shown in the above screenshot.
Let us see how to create individual Maplytics dashboard records for different views of the data which are important for a Sales rep. As mentioned in the blog, one needs to add the fetch XML query for a required view for which an individual Maplytics dashboard has to be created, this blog will explain how to get the fetch XML query for different Maplytics dashboard records.
The following screenshot shows the dashboard that is created by us in our demo environment for Maplytics. Combining the relevant views of the data, the Dynamics CRM dashboard for a sales rep can be made like this. The dashboard shows the data into four parameters – My Appointments, My today’s route, my open opportunities and sales by postal code.

Let’s start with creating Maplytics dashboard records for each of the parameters.
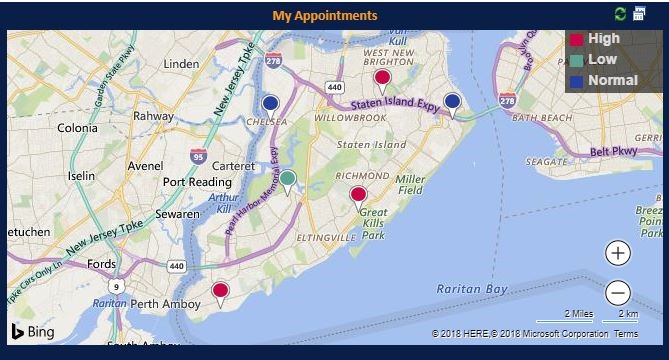
My Appointments
To get the fetch XML query for the Maplytics dashboard record for ‘My appointments’. We need to follow the steps mentioned below:
1. Go to Advanced find and select the following
Look for: Appointments
Use Saved views: My Appointments
Here user can create such a view or even select any other required view from the list.
2. Now click on edit columns

If the entity is linked to Accounts:
Edit columns > Add columns > Record type > Select ‘Regarding (account)’

Select the check boxes for:
- Address 1: Street
- Address 1: Street 2
- Address 1: Street 3
- Address 1: City
- Address 1: State/Province
- Address 1: ZIP/Postal Code
- Address 1: Country/Region
- Address 1: Latitude
- Address 1: Longitude
Likewise, if the entity is linked to Contacts: Edit columns > Add columns > Record type > Select Regarding (contact) and select the check boxes for all the address fields.

In this case, the Appointments can be linked to an account or a contact, we are including the address fields for both Accounts and Contacts.
Note – The record type should be a field from where the address is to be fetched. Also, the address fields should be of the field selected. Make sure that at least of mandatory fields should be selected for the query.
3. Download the generated Fetch XML.

Note: In the queries, when the address data needs to be read from the customer (i.e., it could either hold an account or contact lookup), we need to provide the alias as ‘maplyticsacc’ when a link to a potential customer (account). For contact give alias as ‘maplyticscont’ when a link to a potential customer (contact) or If the address data needs to be read from another OOB or custom entities then you need to provide the alias as “map”.
How to provide alias
The downloaded Fetch XML contains alias for both the Accounts and Contacts. The user needs to replace the alias with ‘maplyticsacc’ and ‘maplyticscont’ respectively.
In this case, we have the following alias present and we have replaced it with the above alias.
Account alias

Replacement: alias=”maplyticsacc“
Contact alias

Replacement: “maplyticscont“
You can enter this download fetch XML query in the field of query as shown in the blog mentioned above. This will show Maplytics dashboard as shown in the screenshot below:
My today’s route
For the route parameter, we can click on the ‘list’ component in the Dynamics CRM dashboard and select Record type as “Routes” and View as “My open save routes” and click on add.


This will add a section which will show the routes assigned to the sales rep as shown below

My open opportunities
Let’s move on to the dashboard for My open opportunities. In the Advanced find we need to enter the following filters.
1. Select the following
Look for: Opportunities
Use Saved views: My Open Opportunities
Here user can create such a view or even select any other required view from their list.
2. Repeat step 2 as mentioned above for the first dashboard: Here an opportunity can be linked to both the Accounts and Contacts, so add the attributes of both the Accounts and Contacts.
3. Repeat the step 3 of providing alias as mentioned above.
After adding the query on the Maplytics dashboard form, enter the entity category as the logical name of estimated revenue. Here the logical name for the estimated value is ‘estimatedvalue’. This will show the data categorized into ranges of estimated value. The user can also edit these ranges into the category configuration. Please click here to know how to use Category configuration. This will show the data categorized into various ranges of estimated value as shown below:

Sales by postal codes
The last dashboard is Sales by postal codes. In the Advanced find we need to enter the following filters.
1. Select the following
2. Look for: Sales
Here user can create a field named sales in the entity record form.
3. Repeat step 2 as mentioned above for the first dashboard: Here the sales can be linked to the Accounts, so add the attributes of the Accounts.
4. Repeat the step 3 of providing alias as mentioned above.
After adding the query on the Maplytics dashboard form:
Select Summary grouping – postal codes
Measure – The logical name of the attribute Sales. In this case, the logical name is new_sales.
These options will show the data on the basis of Postal codes and for the attribute measure of Sales respectively as shown in the following screenshot.

This is how the one can create Maplytics dashboard records to view the data into four parameters. Now these Maplytics dashboard records are to be combined together in one CRM dashboard as mentioned in the blog. As we are creating a sales dashboard we have to follow the steps mentioned below:
Go to Sales > Dashboard > New > Choose layout
As mentioned above we are creating the dashboard with 4 parameters, we have selected a layout of 2 column regular dashboard and then click on create.
Let’s click on the web resource icon which shows ‘insert web resource’ to add the web resources of the Maplytics dashboard.
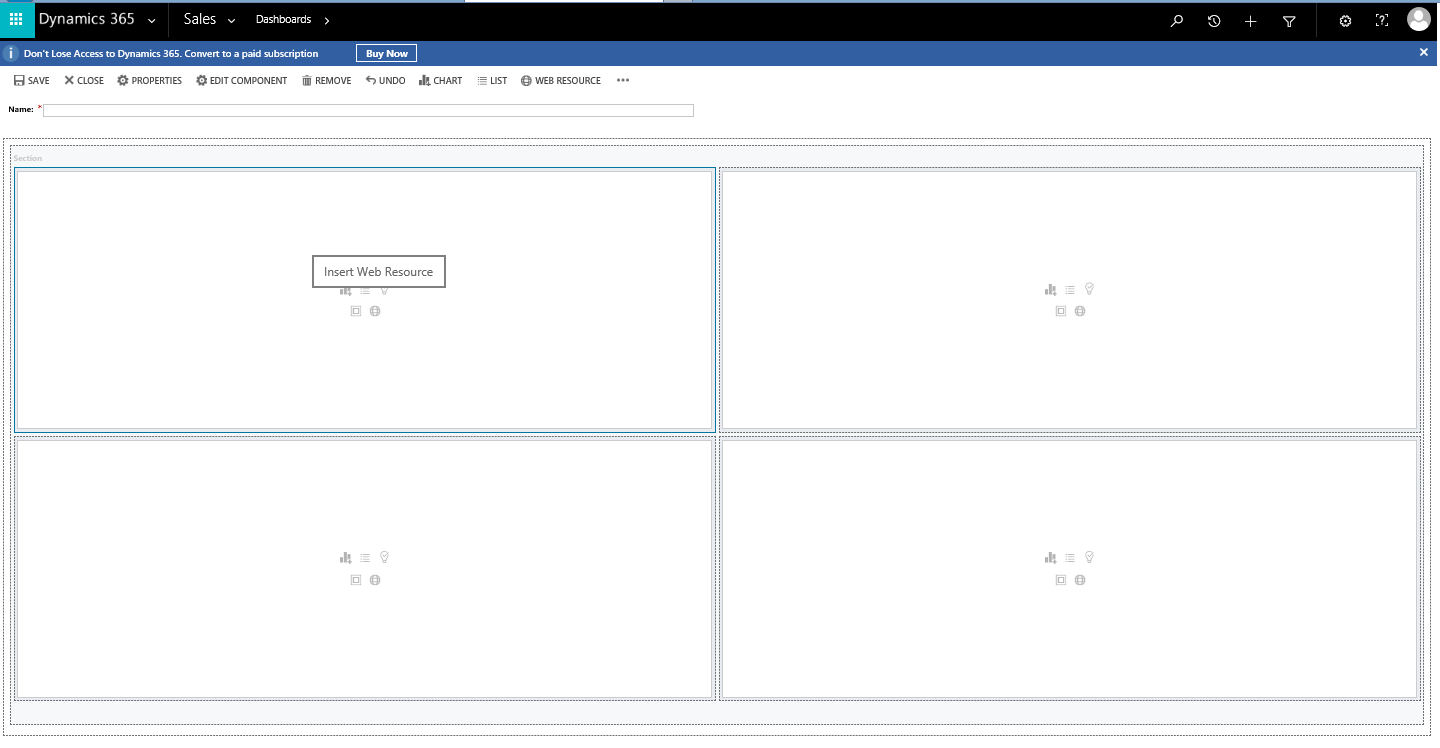
This opens the web resource properties which looks like below:

Web resource: Select the web resource of Maplytics dashboard. Choose “ikl_/Maplytics/Maplytics.Dashboard.html” as the web resource to be used.
Field Name and properties: Users can give a label here. We have given the label ‘My appointments’
Web resource properties: This an important step here. User has to enter the name of the Maplytics dashboard in Custom parameter. We have given ‘My Appointments’, the name we had given while creating the dashboard.
Likewise one can add the other two Maplytics dashboard records – My open opportunities and sales by postal code.
So create dashboards as per your required parameters and start your comparative analysis now. Click here to download Maplytics solution as per your Dynamics CRM version. Your feedback is always welcome and Thank You once again for making Maplytics a preferred solution for integrating Maps with your Dynamics 365 CRM.