We have been very progressive in regards to providing abilities for Routing management. Our customers are happily using the optimized routing management feature of Maplytics. With Maplytics a field rep can plot a route and follow the same to meet various customers in a day. Since going on the field and reaching different locations is a daily requirement of a field person, in our October 2018 release, we have made efforts to make it much easier for the Sales and Service field reps to manage their meetings with an automated schedule.
In our latest October 2018 release, we have added a new feature called Auto Scheduling. With this feature, users can create a schedule with optimized routes planned for multiple days. All the field personnel from sales or service can use this feature to plan their meetings by creating routes and hence have an automated schedule to follow. This will ensure time-saving, ease of planning, and proper management of field resources.
We have discussed a lot about various situations where a salesperson can use Maplytics to plan their meetings. Let’s take an example of a service industry to understand how Auto scheduling can be beneficial to their service team. Let’s say we have a service provider company which provides repair services for elevators. Silvia is the head of the service department who needs to manage the service team for providing repair services to the required locations. She manages the team of technicians so as provide repair services to the locations where the elevators need to be repaired. Here Silvia can very well use the feature of Auto scheduling to plan automated schedules for the technicians so as to provide services to every location.
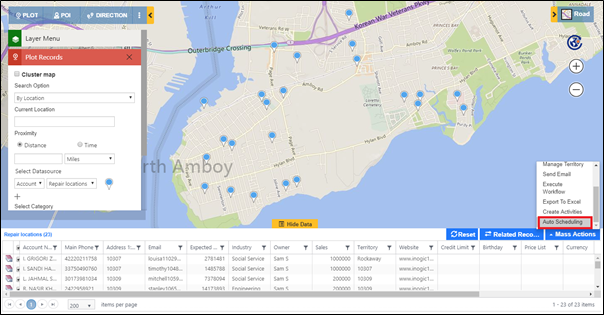
To start with, Silvia has to plan a schedule for a technician William so as to reach the required locations and repair elevators. She will now have to plot a work order on the Detail map to view the customers who need to get their elevators repaired. The screenshot below shows the required customers plotted. We have chosen Accounts as Datasource and Repair locations as view. To create an automated schedule, she can follow the steps mentioned below:
Go to the View grid > Mass actions > Auto Scheduling
 With a click on Auto Scheduling, all the records that are plotted on the map will be considered. These records will now get cleared from the Detail map and we will reach the Auto scheduling section of the Detail map. The below screenshot shows the section of Auto Scheduling into the Detail map with the Auto scheduling card opened.
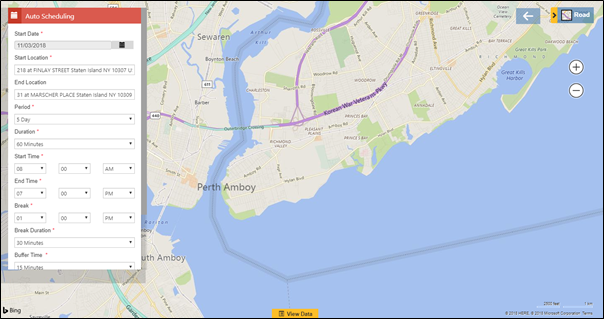
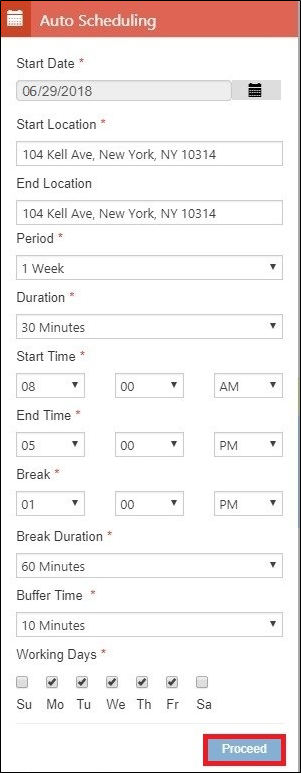
The Auto scheduling card allows the user to enter required details for the Auto scheduling plan, which are Start date, Start Location, End location, Period, Duration, Start time, End time, Break time, Break Duration, Buffer time and Working days.
Based on the details entered in the Auto scheduling card, a schedule will be planned which will provide optimized routes based on the shortest time to meet each of the customers and repair elevators.
Now Silvia can click on Proceed.
This will distribute the records based on the optimization of routes. The routes will be provided for the required number of days having the customers as the waypoints.
The screenshot below shows the optimized route plotted for the first day.
 Silvia can also use the transition bar to view the routes plotted for the other days as well. Based on the optimization, these records have been handled in four days to provide optimized routes.
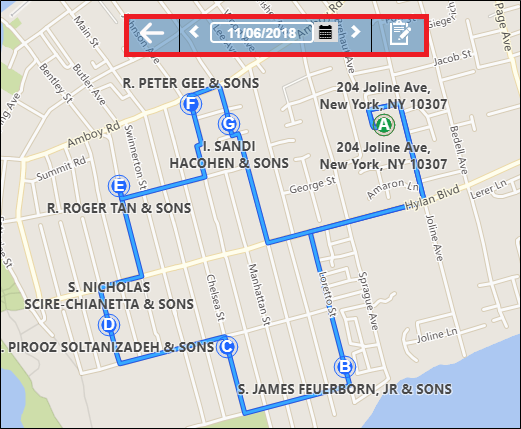
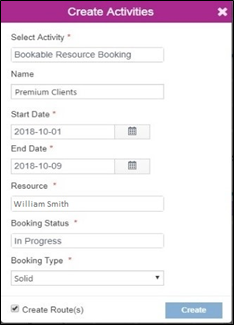
Now that Silvia has plotted the routes she can create Bookable resource bookings by clicking on create activities tab.
![]()
Now, William can plot the routes from the Activity Entity on the map and redirect himself on Google maps for turn by turn navigation to meet the customers Silvia wants him to.
This is how a manager can create an automated schedule for the field person to follow. Any field person like William can also plot an automated schedule for themselves. We have also provided the liberty to set preferences into the user’s configuration records. Let’s say William is creating an automated schedule for himself. He can set preferred default values for himself into his configuration detail record.
Go to Settings > Maplytics > Configuration details > User configuration detail record.
Start using this automated feature for routing management for your field people. Click here to download Maplytics solution as per your Dynamics CRM version.
Also, don’t forget to tell us your experience with Maplytics. We are waiting!


